Don't Hate Me

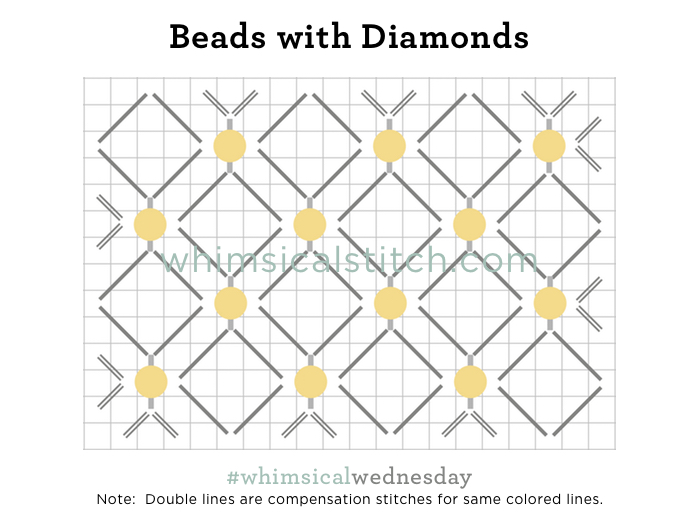
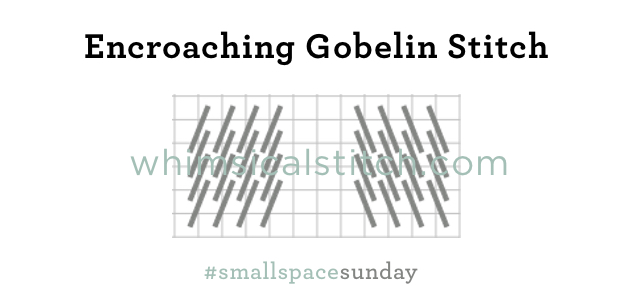
This is a fantastic small space stitch and is one of the few stitches that can stand alone with only one.  But, I swear out loud every single time I use it...and am always thrilled with the end result.  Always.  Today's stitch is the Jessica Stitch.

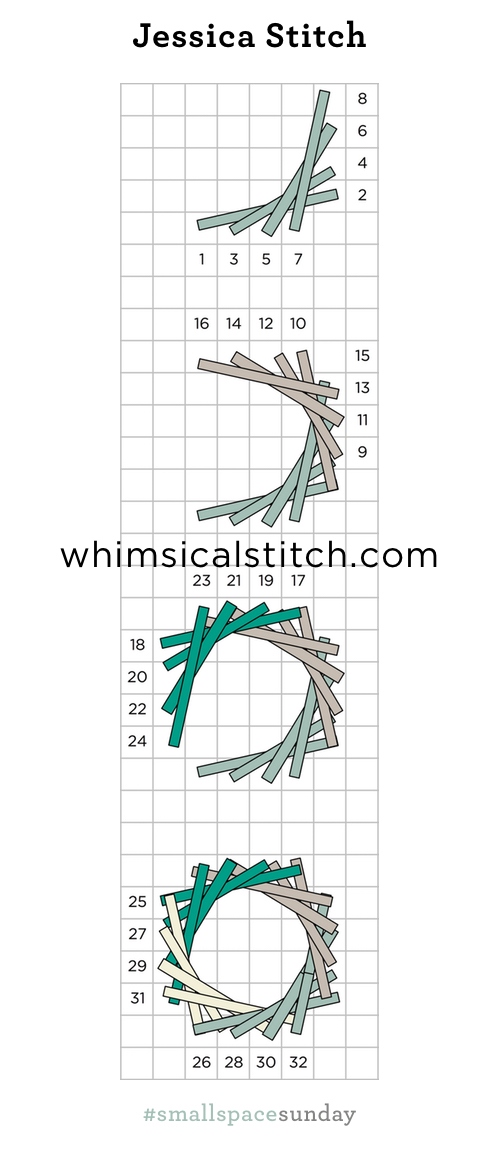
The important thing to remember about the Jessica is, despite appearances, there is a pattern to the stitch and you have to pay attention to the diagram.  The core element is repeated four times, once from each side of the circle.

Jessica Core Element.jpg

For clarity in this diagram (and the next diagram),  the sequence numbers are on the rows just outside the stitch sequence location.  

This pattern repeats itself in all four directions of the stitch.   The pattern begins up one row and over the number of rows your Jessica size will be.  Each subsequent stitch is one row over, UP a single row higher and OVER a single row lower.  For the diagram example, it's four rows.  So, the pattern is:

Up one and over four
Up two and over three
Up three and over two
Up four and over one

You repeat this pattern four times to create the circle.  If you have a stitch starting or ending in any of the four corners, it is no longer a circle, it is a square.  

Jessica.jpg
Click on image to see on whimsicalstitch.com's Instagram account. Visit instagram.com/whimsicalstitch to see a library of stitched samples for select #whimsicalwednesday and #smallspacesunday stitch diagrams.

Click on image to see on whimsicalstitch.com's Instagram account. Visit instagram.com/whimsicalstitch to see a library of stitched samples for select #whimsicalwednesday and #smallspacesunday stitch diagrams.

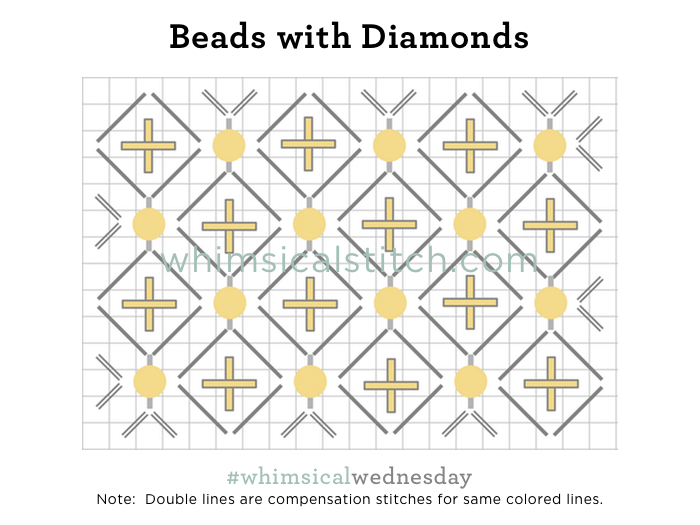
Different colors are used on each side to highlight the comment element for clarity.  In addition, and this is very important, on the last step, each of the four stitches (cream lines) are tucked under the stitches already there (light aqua lines).

The stitched sample on Instagram is from a Melissa Shirley stocking I did for MF9YO (my favorite 9-year old).

This stitch diagram, along with all other #whimsicalwednesday and #smallspacesunday stitch diagrams, can also be found on a Pinterest board here.

Be sure to follow whimsicalstitch.com on FacebookPinterestInstagram, and Twitter.

If you like what you see on this blog, want to learn some very creative decorative stitches, and how to put them all together, whimsicalstitch.com sells stitch guides for Melissa Shirley Designs and Zecca Designs.  28 guides are currently available, including the newest Tea by the Sea, and more are in the pipeline.

So, as the blog title says, don't hate me.  I hope this helps you embrace a really fun stitch and I hope you have the perfect spot for it!  Enjoy!

Tiny Tiny Diamonds!

Today's post is September's final #smallspacesunday.  And it's a really special stitch.  It's an even more petite variation on last week's #smallspacesunday.  .

The stitch is Tiny Diamonds with Beads.  The image file name is "water snow whatever."  Part of that is that it is 6:00 am and I'm a little tired and the other part is this stitch is perfect for snow or water, especially snow or water that is receding in the background of a piece.

Small Diamonds with Beads.jpg

For water (or snow), I recommend a lightweight metallic such as Kreinik Metallics Fine Braid #8 (for 13-mesh) or Kreinik Metallics Very Fine Braid #4 (for 18-mesh).  Any clear, translucent, or light-colored crystal bead will work in the center. 

This stitch diagram, along with all other #whimsicalwednesday and #smallspacesunday stitch diagrams, can also be found on a Pinterest board here.

Be sure to follow whimsicalstitch.com on FacebookPinterestInstagram, and Twitter.

If you like what you see on this blog, want to learn some very creative decorative stitches, and how to put them all together, whimsicalstitch.com sells stitch guides for seasonal Melissa Shirley designs.  28 guides are currently available, including the newest Tea by the Sea, and more are in the pipeline.

Enjoy!

More Beads!

Snow stitches beg for beads.  Today's stitch finds its inspiration in earlier posts.  While I wholeheartedly recommend the Baby Bling stitch or Chopsticks (with beads) for snow, let's change the shape of the stitch in between the beads this week.

I present Beads with Diamonds.  

This is an open stitch that is perfect for the wonderful snow shading.  The light blue or gray shading will show through beautifully with this stitch.  Consider using a clear bead, such as Sundance Beads color 131, for the accent.  Frankly, I would use a light sheen Metallic, such as Flair, Frosty Rays, or Crystal Braid, for the diamond itself.

I'm including a couple of variations to (hopefully) inspire you.  The first adds an Upright Cross stitch to the center of the diamond.  I strongly recommend using two different metallics, one for the Upright Cross and one for the Diamond.  

The last variation leaves the center clear but fills in the diagonal stitch between the diamonds.

Beads with Diamonds Variation 2.jpg

It's all a matter of taste.  And your taste is perfect.  

These stitch diagrams, along with all other #whimsicalwednesday and #smallspacesunday stitch diagrams, can also be found on a Pinterest board here.

Be sure to follow whimsicalstitch.com on FacebookPinterestInstagram, and Twitter.

If you like what you see on this blog, want to learn some very creative decorative stitches, and how to put them all together, whimsicalstitch.com sells stitch guides for seasonal Melissa Shirley designs.  27 guides are currently available and more are in the pipeline.

Enjoy!

Snow in September

Today's trifecta is September, snow, and small spaces.

Honestly, I'm never thrilled when new stitch months begin on a #smallspacesunday.  I get nervous that I won't have the perfect small stitch.  This month is different.  

I had to figure out what to do for small sections of snow on a tree on a Christmas stocking.  I did this technique on a whim, with translucent beads, fully expected to not like it, and worked on a backup plan while I stitched.

Turns out I loved it.  And kept it.  

Frankly, I believe what made it work was that WAS a small space.  This much beading on a large roof, or ground cover, would be overwhelming.  The stitched sample on Instagram shows a lot of the tree so you can see the context.

This stitch diagram, along with other #whimsicalwednesday and #smallspacesunday stitch diagrams, can also be found on www.pinterest.com/whimsicalstitch/whimsicalwednesday.  

Be sure to follow whimsicalstitch.com on FacebookPinterestInstagram, and Twitter.

If you like what you see on this blog, want to learn some very creative decorative stitches, and how to put them all together, whimsicalstitch.com sells stitch guides for Melissa Shirley and Zecca Designs.  27 guides are currently available and more are in the pipeline.

Enjoy!

Fish Sticks

I'm not going to bore you with how long it took me to find this week's stitch.  The moral of the story is to not always associate certain stitches with specific themes.  Meaning, all of these stitches are great for animals but they are great for many other areas.  And vice versa.

Case in point.  I first used this stitch on a sailboat on Emma Williams Rooftops.  Not an animal in sight on that piece.  But...I saw a picture of the same stitch on a fish this morning and voila!  We have a #smallspacesunday.  And it's perfect...absolutely perfect.

And I have not a single clue as to its name.  And that's okay.  I present the Fish Stitch.

Fish Stitch.jpg

This diagram is slightly different from other #whimsicalwednesday diagrams to provide clarity on the steps (left side of diagram) and the compensation stitches (right side of diagram).  The core stitch is up four rows and over two rows.  Always start four rows down from the top!  After you create the first row of stitches, each subsequent horizontal row of stitches overlaps the previous row by a single row.  The compensation stitches are a tiny bit tricky because their angle will rarely match the angle of adjacent stitches.  

The thread combinations are endless.  The diagram is in two colors for clarity.  On the Emma Williams sailboat, I used Silk Lame and Fyre Werks (shown here on Instagram).  The soon to be famous fish (stitch sample can be found here) used a single thread, Silk Lame Braid.  It really depends on the area you are stitching. I hope you have the perfect space for this stitch, whether it is a fish or something else.  More importantly, I hope you enjoy it.

This stitch diagram, along with all other #whimsicalwednesday and #smallspacesunday stitch diagrams, can also be found on a Pinterest board here.

Be sure to follow whimsicalstitch.com on FacebookPinterestInstagram, and Twitter.

If you like what you see on this blog, want to learn some very creative decorative stitches, and how to put them all together, whimsicalstitch.com sells stitch guides for seasonal Melissa Shirley designs.  27 guides are currently available and more are in the pipeline.

Enjoy!

A Menagerie!

Today's #smallspacesunday is pretty straightforward.  The stitches below have been covered on previous #smallspacesundays but are especially appropriate for animals, so I'm resharing here.

The first is Encroaching Gobelin, perfect for almost any animal, especially a small one, because of its compact size, smoothness, and ability to change directions.

The next stitch is one of my favorites.  While the Cushion Stitch is more complex, it makes a great wing or body stitch as it has a bit of texture.

Brick Stitch, especially over two rows is perfect for a small rabbit, duck, or squirrel.  Don't forget to switch the direction to horizontal if the animal isn't sitting up.  The Brick Stitch is also scalable.  For a larger space, go over four rows, instead of two as diagramed below.  

The Upright Cross is an all-purpose small space stitch for any animal.

These stitch diagrams, along with all other #whimsicalwednesday and #smallspacesunday stitch diagrams, can also be found on a Pinterest board here.

Be sure to follow whimsicalstitch.com on FacebookPinterestInstagram, and Twitter.

If you like what you see on this blog, want to learn some very creative decorative stitches, and how to put them all together, whimsicalstitch.com sells stitch guides for seasonal Melissa Shirley designs.  27 guides are currently available and more are in the pipeline.

Enjoy!

Chopsticks!

I found this little gem in Carolyn Hedge Baird's Teeny Tiny Needlepoint Stitches.  I'm having a blast with it of late.

The base stitch (the black lines) creates oblong diamonds.  Note the stitches are up (or down) two rows and over one.  Simply add an Upright Cross in the intersections and, voila!  Adorableness!

The second version integrates beads instead of Upright Crosses.  Frankly, more adorable.

I purposefully did not add the very small compensation stitches above the top row of beads and below the lower row of beads because the stitches are so small that their inclusion does not make a meaningful difference.

The stitched sample on Instagram illustrates the top version of this stitch on a roof on a Debbie Mumm cottage.  It was a quick and easy stitch.  


Frankly, due to the small nature of this stitch, I recommend a single strand thread such as Elegance, Pearl Cotton, Vineyard Silk, and the like.  If you use a stranded silk, cotton floss, or wool (as I did above), I recommend using a minimal number of strands to keep the elongated diamond well defined.

These stitch diagrams, along with other #whimsicalwednesday and #smallspacesunday stitch diagrams, can also be found on pinterest.com.

Be sure to follow whimsicalstitch.com on FacebookPinterestInstagram, and Twitter.

If you like what you see on this blog, want to learn some very creative decorative stitches, and how to put them all together, whimsicalstitch.com sells stitch guides for seasonal Melissa Shirley designs.  26 guides are currently available, including three new Debbie Mumm Santa guides and the blue version of the Shell Table.  More are in the pipeline.  In fact, I'm waiting for one finished piece to return from the finisher, so it will be any day now!

I hope you enjoy this stitch as much as I am!

The Smallest of All

At the heart of all needlepoint is the single, simple needlepoint stitch.  There are several names for what I call Plain Needlepoint.  You may see it called Plain Needlepoint, Tent, Basketweave, Half Tent, Continental, or combinations of those.  They are all variations of the same theme, specifically a single stitch laid diagonally (at a 45 degree angle) over an intersection from the lower left corner to the upper right corner.

Simply put, the methods vary in sequence, coverage, and look on the back of the canvas. However, they all look the same on the front of the canvas.  Continental and Basketweave are the two primary methods I use for Plain Needlepoint and I recommend each for specific applications.

Basketweave is my primary and preferred method.  It provides consistent and even coverage on both the front and back of a canvas.  In addition, basketweave minimizes the need for blocking a canvas after it has been stitched.    

Click on image to see on whimsicalstitch.com's Pinterest account. Visit pinterest.com/whimsicalstitch/whimsicalwednesday for a library of all #whimsicalwednesday and #smallspacesunday stitch diagrams.

Click on image to see on whimsicalstitch.com's Pinterest account. Visit pinterest.com/whimsicalstitch/whimsicalwednesday for a library of all #whimsicalwednesday and #smallspacesunday stitch diagrams.

Beginning in the upper right corner, add a stitch.  Move to the row to the left and begin the second row of stitching…going down the diagonal row.  Repeat this sequence up and down the area, always on the diagonal rows.   The first diagram illustrates the concept.  The second diagram illustrates each diagonal row by color to clearly separate the rows.

 
Click on image to see on whimsicalstitch.com's Pinterest account. Visit pinterest.com/whimsicalstitch/whimsicalwednesday for a library of all #whimsicalwednesday and #smallspacesunday stitch diagrams.

Click on image to see on whimsicalstitch.com's Pinterest account. Visit pinterest.com/whimsicalstitch/whimsicalwednesday for a library of all #whimsicalwednesday and #smallspacesunday stitch diagrams.

The Continental stitch covers each horizontal row in sequential order, both across and down, ending with a similar look as Basketweave.

Starting in the upper right corner, add the first stitch and move across the horizontal row to the left.  When you complete the first row, you (literally) turn your canvas upside down and repeat the same stitch going back across the second row.  You alternate the direction of the canvas for each row.  (In the diagram, the canvas is upright for black stitches and upside down for turquoise stitches.)

If you do the turquoise rows with the canvas upright, the typical mistake is to start from the lower left corner and end in the upper right corner.  This results in one tiny vertical stitch covering the row on the back of the canvas, leaving the area open to light and an uneven appearance on the front of the canvas.


My preferred combination is Continental stitch for any single row of needlepoint, such as an outline, window frame, or simple flower stem.  For any areas wider or longer than one row in either direction, I use the Basketweave stitch. 

Plain Needlepoint is a classic and good looking stitch.  It is a nod to tradition and is quite elegant on its own, especially when used to add shading to an area.  I don't have that many rules about needlepoint.  However, I feel very strongly that all needlepoint projects should have spaces dedicated to Plain Needlepoint.  I love decorative stitches and Plain Needlepoint helps set them apart and gives the eye someplace to rest.  It's a matter of balance. 

These stitch diagram, along with all other #whimsicalwednesday and #smallspacesunday stitch diagrams, can also be found on a Pinterest board here.

Be sure to follow whimsicalstitch.com on FacebookPinterestInstagram, and Twitter.

If you like what you see on this blog, want to learn some very creative decorative stitches, and how to put them all together, whimsicalstitch.com has a book for you! Mary’s Whimsical Stitches is a contemporary how-to collection of more than 250 stitches for stitchers regardless of skill level. The book includes updated and sequenced diagrams from this blog, all-new stitches, and a chapter on the basics of needlepoint. For more information, visit here.

whimsicalstitch.com also sells Stitch Guides and Stitch Concepts for Melissa Shirley Designs, Zecca DesignsSandra Gilmore, Purple Palm, Maggie, and Penny MacLeod, and many more. Click here to see the newest guides and click here to see the entire collection.

I hope you have the perfect spot for this stitch! Please enjoy! Have a wonderful #whimsicalwednesday!

A Note about Diagrams
I use color in diagrams to make them as clear as possible.  The primary function of different colored lines is to illustrate a stitch sequence.  For example, layering of colors demonstrates you add them in that order.  They can also provide ideas on how to integrate additional threads (one line for each color).  Or, you can use the same thread for all color lines.  That's where I encourage you to use your imagination for the space you are stitching!

It's a (Small) Brick House

Today's stitch is a small version of the Cashmere stitch.  The Alternating Cashmere stitch simply alternates 4X2 rectangles, leaving one intersection available for an accent.

It's great for small houses, as illustrated by the stitched sample on Instagram.  Other ideas for areas include backgrounds for small pieces (ornaments, box inserts, eyeglass cases, etc), clothing in smaller areas (especially pants), boots (for any size boots), rooftops, or ground cover.    

So, a funny thing happened on the way to the accent stitch (the yellow lines).  While I charted it to be distinctly different, whether through contrasting color or contrasting thread type, when I stitch, I've been using the same thread as the remainder of the area for a really subtle end result. 

This stitch diagram, along with other #whimsicalwednesday and #smallspacesunday stitch diagrams, can also be found on www.pinterest.com/whimsicalstitch/whimsicalwednesday.  

Be sure to follow whimsicalstitch.com on FacebookPinterestInstagram, and Twitter.

If you like what you see on this blog, want to learn some very creative decorative stitches, and how to put them all together, whimsicalstitch.com sells stitch guides for seasonal Melissa Shirley designs.  22 guides are currently available and more are in the pipeline.

Enjoy! 

Small Skies Part 2

We wrap up the month of sky stitches with a #smallspacesunday.  I've named today's stitch "Small Trellis" because it reminds me of a trellis, I can't find a real name for it, and you may know by now that names aren't essential to me.  Seriously.  When we chat about stitches at my local needlepoint store, it goes like this:

Needlepoint Friend*:  "Does anyone have an idea for how I can stitch this area?"

Me:  "Oh, sure.  Do 1-2-1-2-1 with the thing in the center.  So and so did it on the flower center in the Zecca piece."

Needlepoint Friend:  "Oh!  I know exactly what you're talking about.  Sounds great.  Thanks."

*  Clearly, we've been doing this together for a while and have that shorthand.

This stitch would probably be called the "2-1-2 Diamond and don't worry about the centers."

This stitch is adaptable to so many spaces.  What makes it work for a sky is leaving the centers, both the square and the diamond shaped centers, empty.  For most other spaces, I would fill in one or both, but the simplicity of this makes it perfect for a sky.

I prefer this stitch with a lightweight matte thread.  Elegance or Grandeur are my go to threads here.  The stitched sample on Instagram uses Elegance on 18-mesh.

On a separate but related subject, I would love to receive feedback on whimsicalstitch.com.  Please visit this link to fill out a short survey.  Thank you!

This stitch diagram, along with other #whimsicalwednesday and #smallspacesunday stitch diagrams, can also be found on www.pinterest.com/whimsicalstitch/whimsicalwednesday.  

Be sure to follow whimsicalstitch.com on FacebookPinterestInstagram, and Twitter.

If you like what you see on this blog, want to learn some very creative decorative stitches, and how to put them all together, whimsicalstitch.com sells stitch guides for seasonal Melissa Shirley designs.  22 guides are currently available and more are in the pipeline.

Enjoy!