Small Skies

There really is no such thing as a small sky except, well, maybe in needlepoint.

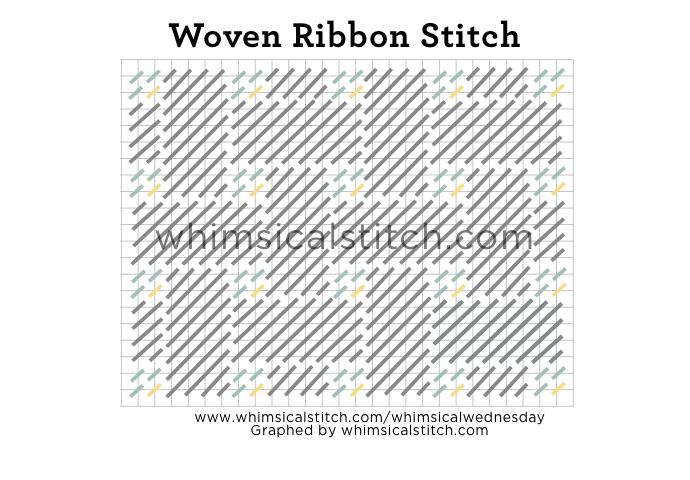
This stitch is beyond straightforward (pun intended) and is one of the most subtle sky stitches.  It would work for a large sky if you really want to minimize the sky.

Start the first column from the opposite side of the column closest to the edge.  In this case, I'm starting on the left edge of the canvas so my stitch starts on the right side of the column.  This ensure the columns are neat with crisp edges.  

As you can see, there is an empty row in between the columns.  You can leave it blank or fill the column with Plain Needlepoint.  Personally, I like the space blank as it keeps it subtle.

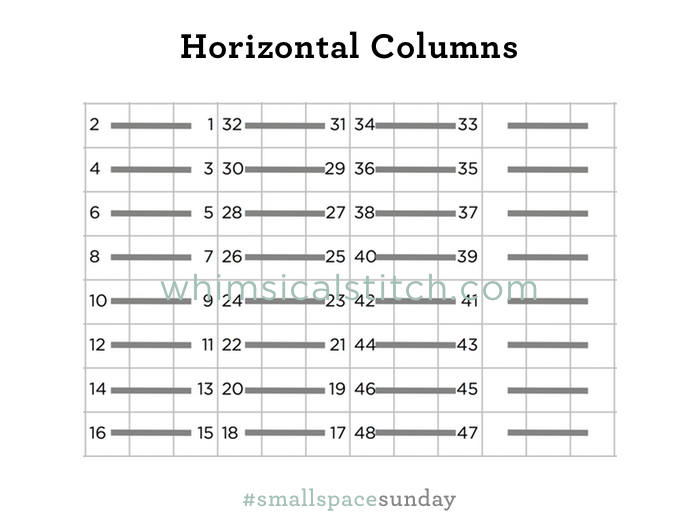
The columns can be the same width or you can vary the width depending on the width of the space to be stitched.  

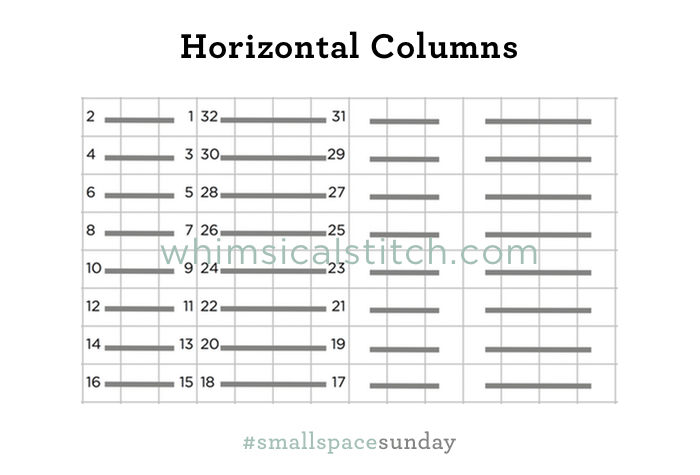
This diagram alternates columns over three rows and over two rows.  It's up to you and the space requirements.  Find a sequence you like and have fun with it!  You could alternate columns over two row and four rows.  You could add a third column into the mix and make it over two, over three, over four, over three, over two.  The larger the space the more fun you can have with column width sequences.

For whatever reason I can't quite verbalize, I really like this stitch in a lightweight metallic.  My go to metallic for skies is Kreinik Metallics Very Fine Braid (#4) on 18-mesh and Fine Braid (#8) on 13-mesh.  Petite Silk Lame is a great alternative for both size canvases. 

These stitch diagrams, along with other #whimsicalwednesday and #smallspacesunday stitch diagrams, can also be found on www.pinterest.com/whimsicalstitch/whimsicalwednesday.  

Be sure to follow whimsicalstitch.com on FacebookPinterestInstagram, and Twitter.

If you like what you see on this blog, want to learn some very creative decorative stitches, and how to put them all together, whimsicalstitch.com sells stitch guides for seasonal Melissa Shirley designs.  22 guides are currently available and more are in the pipeline.

Enjoy!

I Call It Cheating

And I fully endorse it!

Okay, today's post is about padding.  But it's so easy, I consider it cheating.

On the off chance you don't know, Melissa Shirley does great holiday stuff.  And holiday stuff often involves snow.  The big snow spaces are a lot of fun as you can do fun and creative stitches.  The smaller snow spaces can be a challenge.  Plain needlepoint often works, but it's not always the perfect choice.

Enter padding.  I love it, especially for snow.  It's a great technique for snow on trees, on a window sill, or chimney, just as thought starters.

There are two steps and two threads.  The first step, with the base thread, adds depth to the padded area.  The second thread is the top thread.  It covers the base thread and is the only visible thread when the padding is complete.

The base thread is a strand of thicker thread.  Very Velvet or a larger than normal Pearl Cotton work well here.  You should choose a color similar to the top thread. The top thread covers the base thread in the opposite direction and provides the final look.  Be sure to cover the first and last rows of the base thread so the base thread isn't visible (step 1-2 and final step in Step 2).

Padding.jpg

Most padding requires only one layer of base thread.  If you want to create more pronounced padding, add 1-2 more layers of base thread.  Be careful to not add so many layers that the canvas holes get stretched.

If you don't like the coverage one round of top thread provides, cover the padding with a second round of the top thread.  

Very Velvet and Pearl Cotton make excellent base rows.  I prefer wider threads for the top thread, such as Flair, Fyre Werks, Treasure Ribbon, Frosty Rays, or plied floss (with a laying tool to maximize its width and coverage).

These stitch diagrams, along with other #whimsicalwednesday and #smallspacesunday stitch diagrams, can also be found on www.pinterest.com/whimsicalstitch/whimsicalwednesday.  

Be sure to follow whimsicalstitch.com on FacebookPinterestInstagram, and Twitter.

If you like what you see on this blog, want to learn some very creative decorative stitches, and how to put them all together, whimsicalstitch.com sells stitch guides for seasonal Melissa Shirley designs.  Ten guides are currently available and more are in the pipeline.

Enjoy!

Which One is Your "Just Right?"

Woven Hungarian is one of my favorite stitches and, I confess, you will find it on virtually every piece I stitch.  It's a great stitch for large or small spaces, yet what often is overlooked is its scalability.

The base pattern includes alternating rows of sequences of three stitches going over 2-3-2 rows. Depending on how much shading you want to show through or how dressed up the stitch needs to be, the accent stitch can be a cross stitch, French Knot, bead (as diagramed), or empty.  

Click on the image to see on whimsicalstitch.com's Pinterest account. Visit pinterest.com/whimsicalstitch/whimsicalwednesday for a library of all #whimsicalwednesday and #smallspacesunday stitch diagrams.

Click on the image to see on whimsicalstitch.com's Pinterest account. Visit pinterest.com/whimsicalstitch/whimsicalwednesday for a library of all #whimsicalwednesday and #smallspacesunday stitch diagrams.

Click on the image to see on whimsicalstitch.com's Instagram account. Visit instagram.com/whimsicalstitch to see a library of stitched samples for select #whimsicalwednesday and #smallspacesunday stitch diagrams.

Click on the image to see on whimsicalstitch.com's Instagram account. Visit instagram.com/whimsicalstitch to see a library of stitched samples for select #whimsicalwednesday and #smallspacesunday stitch diagrams.

Things start to get interesting when you expand the stitch, especially for large spaces such as skies, water, and large spaces in what I call masterpieces, meaning very large dramatic canvases with large areas to fill.

The first expansion (below left) increases the length of the stitches from two and three rows to four and five rows. The last variation (below right) expands four and five rows to six and seven rows.  And it's huge.  And I love what it could do for a large canvas, especially a sky or gorgeous kimono.  I have no other name for this, other than massive.

Click on the image to see on whimsicalstitch.com's Pinterest account. (Note: actual image on Pinterest may vary. It is the same stitch.) Visit pinterest.com/whimsicalstitch/whimsicalwednesday for a library of all #whimsicalwednesday and #smallspaces…

Click on the image to see on whimsicalstitch.com's Pinterest account. (Note: actual image on Pinterest may vary. It is the same stitch.) Visit pinterest.com/whimsicalstitch/whimsicalwednesday for a library of all #whimsicalwednesday and #smallspacesunday stitch diagrams.

Goldilocks always thought the smallest object was the best but, in this case, the larger alternatives are more than fascinating.

This stitch diagram, along with all other #whimsicalwednesday and #smallspacesunday stitch diagrams, can also be found on a Pinterest board here. Be sure to follow whimsicalstitch.com on FacebookPinterestInstagram, and Twitter.

IIf you like what you see on this blog, there's more: Mary’s Whimsical Stitches Volume 1 is a contemporary how-to collection of more than 250 stitches for stitchers regardless of skill level. The book includes updated and sequenced diagrams from this blog, all-new stitches, and a chapter on the basics of needlepoint; Mary’s Whimsical Stitches Volume 2 features chapters on Balanced, Beading, Diagonal, Layered, Oblique, Small, and Straight stitches.

Also, you can download for free the first chapter from my first book which covers basic needlepoint stitches and stitch compensation techniques along with new top-line information on needlepoint materials and tools, how to handle threads, and other helpful needlepoint resources.

whimsicalstitch.com also sells Stitch Guides and Stitch Concepts for Melissa Shirley Designs, Zecca DesignsSandra Gilmore, Purple Palm, Maggie, and Penny MacLeod, and many more. Click here to see the newest guides and click here to see the entire collection.

I hope you have the perfect spot for this stitch! Please enjoy! Have a wonderful #whimsicalwednesday!

A Note about Diagrams
I use color in diagrams to make them as clear as possible.  The primary function of different colored lines is to illustrate a stitch sequence.  For example, the layering of colors demonstrates you add them in that order.  They can also provide ideas on how to integrate additional threads (one line for each color).  Or, you can use the same thread for all color lines.  That's where I encourage you to use your imagination for the space you are stitching! 

Woven Whimsy

There is something to be said for the tried and true stitches.  And when they can serve in multiple roles, all the better.  

Allow me to introduce you to (what I call) the Woven Ribbon stitch.  There are far too many things I like about it.  It is a clean, symmetrical design.  It serves well in large spaces without overpowering the piece.  The 2X2 row of stitches in between the larger squares can be glammed up with beads or a Smyrna Cross or dressed down with simple single stitches.

My favorite thing about it is that it does the job for a variety of larger spaces.  I've used it as a sky, a coat, a basket, a table top, wallpaper.

Enjoy the stitch!  Help inspire us by letting us know how you use it!

PS  I admit I might be more excited I figured out how to insert the image in the original blog post.  That said, I'm still posting all #whimsicalwednesday stitches on Pinterest (www.pinterest.com/whimsicalstitch) and Instagram (www.instagram.com/whimsicalstitch).  Enjoy!