Big Blue Skies

May blog posts focus on sky stitches.  There is not a single formula for sky stitches.  Some are small and need to blend quietly into the background, while others are dramatic and require attention.

The stitch diagrams shared over the next few weeks are just a few ideas for your next skies. There are so many stitches that can be adapted for a sky...I hope these give you lots of inspiration to look at stitches in your collection differently.

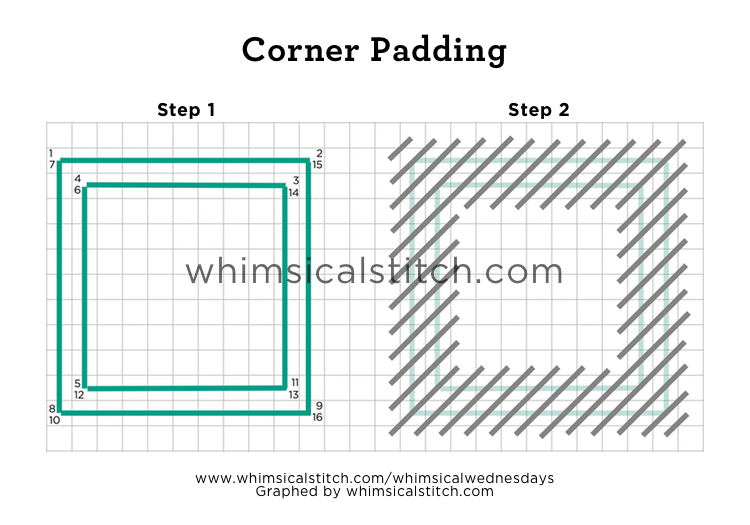
The first sky post focuses on a more discreet sky stitch.  

Woven Sky.jpg

For a sky, this stitch works best with a single thread or two threads with similar color values. Using a single thread, especially a twisted silk (such as Elegance), provides good coverage on 18-mesh.  On 13-mesh, the shading will show through in a subtle way.  

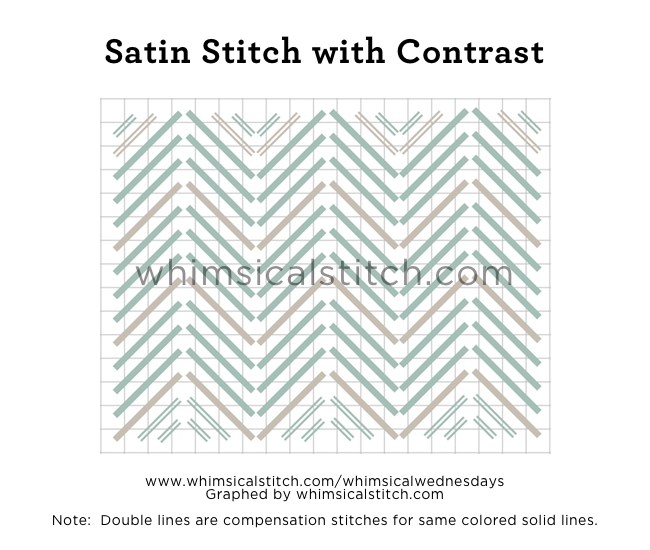
For a two thread version, one of my favorite thread combinations is Elegance and Flair, regardless of whether I'm working with 13- or 18-mesh. The subtle matte of the Elegance is a nice partner with the subtle metallic of the Flair.  A good alternative to Elegance is DMC or Anchor Pearl #8.  Let the colors determine the right threads.  I think it's best if you do the matte thread on the horizontal and the metallic thread on the vertical.  I can't explain it.  I've tried it both ways and find that combo to be the best.  

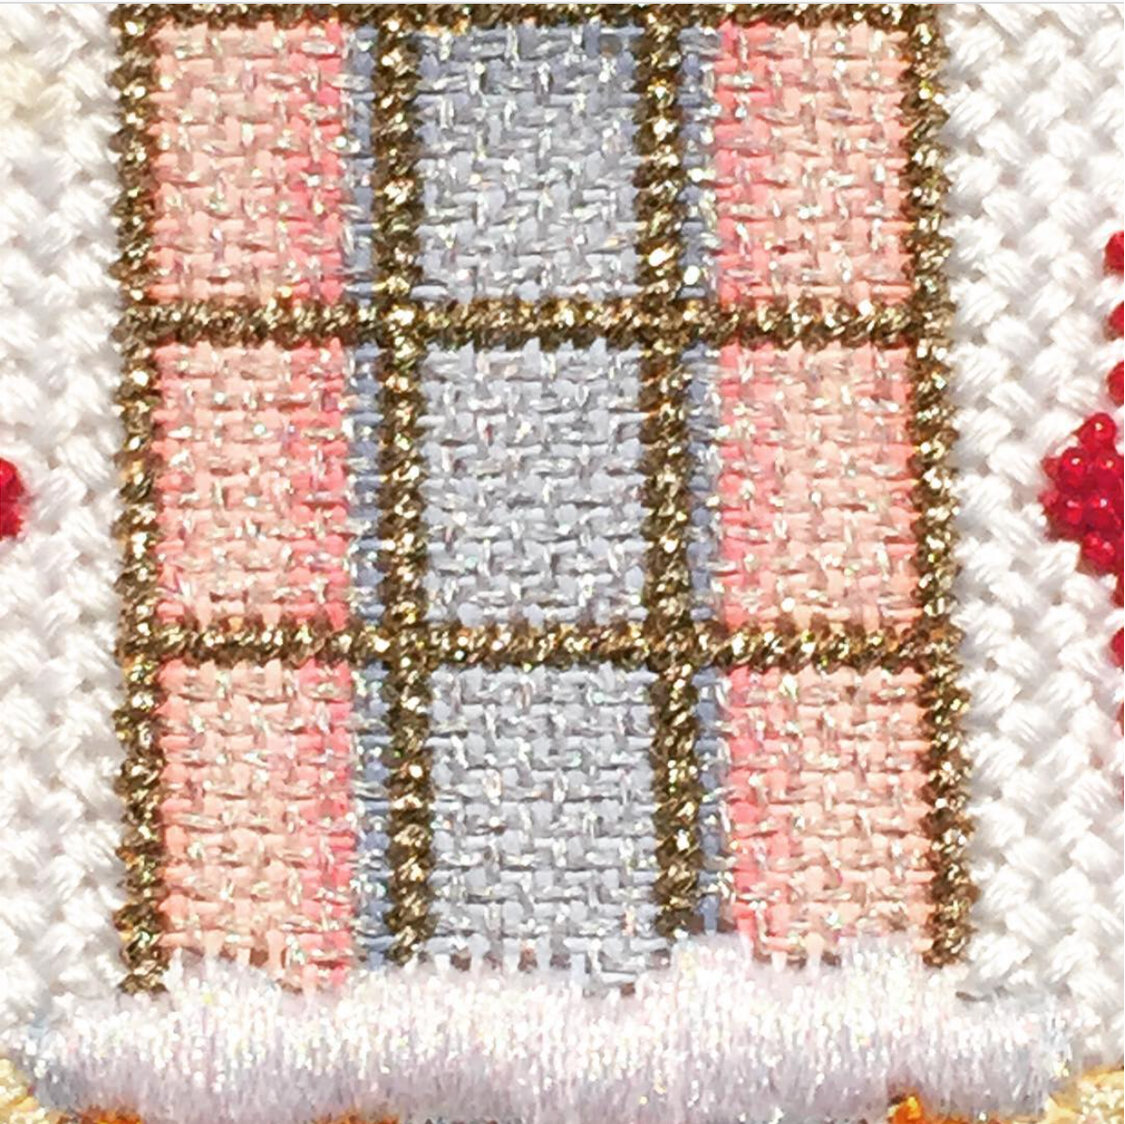
The stitched sample on Instagram illustrates the scalability of this stitch (over five rows in groups of four stitches) and a slightly different pattern of matte and metallic.

Don't let this post limit your thinking on this stitch as singularly a sky stitch.  It's a great stitch for many other areas, including ground cover, baskets, clothing, and even a large-ish window. The key to this stitch is it works best for an area you don't want to draw a lot of attention to, but you want to do something special.  The second stitched sample on Instagram illustrates its use for a rug with Sea Grass thread.

This stitch diagrams, along with other #whimsicalwednesday and #smallspacesunday stitch diagrams, can also be found on www.pinterest.com/whimsicalstitch/whimsicalwednesday.  

Be sure to follow whimsicalstitch.com on FacebookPinterestInstagram, and Twitter.

If you like what you see on this blog, want to learn some very creative decorative stitches, and how to put them all together, whimsicalstitch.com sells stitch guides for seasonal Melissa Shirley designs.  21 guides are currently available and more are in the pipeline.

Enjoy!


Sweet Sky

Welcome to the month of skies!  We kick off the month with a #smallspacesunday.

Today's stitch is the Step Stitch.  The openness allows the beautiful shading of most skies to show through the thread.  What I like most about it is its scalability.  You can do the stitches as small as two, or larger depending on your space.   

The diagram is over three, as is the stitched sample on Instagram.  The stitched sample also illustrates that it doesn't matter which direction you go on the diagonal.  The diagram is up to the left and the sample is up to the right.

As with most open stitches, I like to use a slightly lighter weight thread than a canvas typically calls for.  As an example, a dark night sky on a Christmas stocking (on 18 mesh) looks fantastic with a single strand of Petite Silk Lame.  Petite Silk Lame is the perfect combination of matte and metallic in one thread.  If you want your night sky to shimmer, consider Kreinik Metallics Very Fine Braid (#4) on 18 mesh.  For a daytime sky, my go to thread is Elegance, regardless of mesh size.   DMC and Anchor Pearl #8 and #12 are two more to consider, and they have a wider color selection.

This stitch diagram, along with other #whimsicalwednesday and #smallspacesunday stitch diagrams, can also be found on www.pinterest.com/whimsicalstitch/whimsicalwednesday.  

Be sure to follow whimsicalstitch.com on FacebookPinterestInstagram, and Twitter.

If you like what you see on this blog, want to learn some very creative decorative stitches, and how to put them all together, whimsicalstitch.com sells stitch guides for seasonal Melissa Shirley designs.  20 guides are currently available and more are in the pipeline.

Enjoy!

Turning a Corner

Today's border concept is Padding.  This post elaborates on the earlier #whimsicalwednesday post on padding and takes it one step further by illustrating how to get around corners.

With all padding, the base rows (turquoise lines) can be added with efficiency.  It is not critical to have crisp edges or coverage for the border rows on the back.  They will be covered and no one will be able to tell that you took varying short cuts in between rows.  However, it is important the path(s) you follow are contained within the border area so there are no base threads dragged across the non-border area of the canvas.   Step 1 illustrates a potential path.  This ensures the base threads will be covered by the top threads (gray lines) on both sides of the canvas, enclosing the entire border.

In Step 2, navigating the wide corners (upper left and lower right) requires focus.  To get a crisp and clean inside corner, split the stitch where the inside corners meet for the first time.  In this example, the border is over three rows.  Corners will meet when the border will be over six rows (double the width).  Don't do over six rows with one stitch!  Split it into two stitches, over three rows each, for a crisp corner.  The lime green and aqua stitched sample on Instagram illustrates a padded corner over three rows

There are a few things worth repeating from the first post about padding.  Most padding requires only one layer of base thread.  If you want to create more pronounced padding, add 1-2 additional layers of base thread.  One of the stitched samples on Instagram illustrates a very thick padding.  Kelly wasn't sure how many layers of padding he added to that border...but it might have been double digit.  It's a dramatic and beautiful example of padding.  

Very Velvet and Pearl Cotton #3 make excellent base rows.  I prefer wider threads for the top thread, such as Flair, Fyre Werks, Treasure Ribbon, Frosty Rays, or plied floss (with a laying tool to maximize its width and coverage).

This stitch diagram, along with other #whimsicalwednesday and #smallspacesunday stitch diagrams, can also be found on www.pinterest.com/whimsicalstitch/whimsicalwednesday.  

Be sure to follow whimsicalstitch.com on FacebookPinterestInstagram, and Twitter.

If you like what you see on this blog, want to learn some very creative decorative stitches, and how to put them all together, whimsicalstitch.com sells stitch guides for seasonal Melissa Shirley designs.  20 guides are currently available and more are in the pipeline.

Enjoy!

Tiniest Changes

The tiniest changes make a huge difference.  For example, take the Satin Stitch.  The generally accepted form is over two or more rows on the diagonal, going from lower left intersection to upper right intersection.  If you want to go a little wild, try alternating directions in the columns.  It's the perfect stitch standard for so many areas, especially leaves, furniture, walls, backgrounds, or clothing, to name just a few.  

Yet, you can take this wonderfully straightforward stitch and make it something that really pops by doing one thing.  Add a contrasting row.

The gray lines in the diagram are a high contrast color or thread finish.  A color example is City Needlework Silk red for the aqua lines with a blue silk for the gray lines.  A thread finish example is using a lighter weight thread for the green lines and a heavier Very Velvet, in the same color values, adding interesting texture to an area.  You can also combine contrasting color and finish.

You can also play with it by adding more rows in between the gray rows, or fewer rows.  It's up to your imagination and what the space requires.

The first stitched sample on Instagram is a leaf on a Melissa Shirley bird houses canvas and is a highly contrasting color version of the stitch and has two rows in between the contrasting row.  The second sample on Instagram is an example of using contrasting finishes (stranded silk and shiny Fyre Werks).

This stitch diagram, along with other #whimsicalwednesday and #smallspacesunday stitch diagrams, can also be found on www.pinterest.com/whimsicalstitch/whimsicalwednesday.  

Be sure to follow whimsicalstitch.com on FacebookPinterestInstagram, and Twitter.

If you like what you see on this blog, want to learn some very creative decorative stitches, and how to put them all together, whimsicalstitch.com sells stitch guides for seasonal Melissa Shirley designs.  18 guides are currently available and more are in the pipeline.

Enjoy!

Reverse #smallspacesunday

This week's #smallspacesunday post shares the Reverse Basketweave stitch.  

Click on image to see on whimsicalstitch.com's Pinterest account. Visit pinterest.com/whimsicalstitch/whimsicalwednesday for a library of all #whimsicalwednesday and #smallspacesunday stitch diagrams.

Click on image to see on whimsicalstitch.com's Pinterest account. Visit pinterest.com/whimsicalstitch/whimsicalwednesday for a library of all #whimsicalwednesday and #smallspacesunday stitch diagrams.

Click on image to see on whimsicalstitch.com's Instagram account. Visit instagram.com/whimsicalstitch to see a library of stitched samples for select #whimsicalwednesday and #smallspacesunday stitch diagrams.

Click on image to see on whimsicalstitch.com's Instagram account. Visit instagram.com/whimsicalstitch to see a library of stitched samples for select #whimsicalwednesday and #smallspacesunday stitch diagrams.

What I love about this stitch is it adds texture and some dimension to a small space, all the while keeping it very neat and clean.  Consider it for a small basket, hat, gloves, ground cover, bushes (in the background), lamp base, side table, small fruits or vegetables...you get the idea. 

Like other small space stitches, this stitch works well with overdyed threads as it merges the various hues of the thread well and doesn't overpower a piece.  

It is a great stitch to use if you want the shading to show through.  To accomplish that, use a very light thread weight based on the canvas mesh you are using.  For example, use Elegance on a 13-mesh canvas or Kreinik Metallics Very Fine Braid (#4) on 18-mesh.  

As an example, I use this stitch frequently for window glass, especially with a Kreinik Metallic. I use Kreinik Metallics color 032 (Pearl) in a Very Fine Braid (#4) on 18-mesh and Fine Braid (#8) on 13-mesh.  It provides the shiny look of glass all the while allowing the colors of the window as painted to show through.  

This stitch diagram, along with all other #whimsicalwednesday and #smallspacesunday stitch diagrams, can also be found on a Pinterest board here.

Be sure to follow whimsicalstitch.com on FacebookPinterestInstagram, and Twitter.

If you like what you see on this blog, want to learn some very creative decorative stitches, and how to put them all together, whimsicalstitch.com has a book for you! Mary’s Whimsical Stitches is a contemporary how-to collection of more than 250 stitches for stitchers regardless of skill level. The book includes updated and sequenced diagrams from this blog, all-new stitches, and a chapter on the basics of needlepoint. For more information, visit here.

whimsicalstitch.com also sells Stitch Guides and Stitch Concepts for Melissa Shirley Designs, Zecca DesignsSandra Gilmore, Purple Palm, Maggie, and Penny MacLeod, and many more. Click here to see the newest guides and click here to see the entire collection.

I hope you have the perfect spot for this stitch! Please enjoy! Have a wonderful #smallspacesunday!

A Note about Diagrams
I use color in diagrams to make them as clear as possible.  The primary function of different colored lines is to illustrate a stitch sequence.  For example, layering of colors demonstrates you add them in that order.  They can also provide ideas on how to integrate additional threads (one line for each color).  Or, you can use the same thread for all color lines.  That's where I encourage you to use your imagination for the space you are stitching!

There is Always an Exception

You may notice I am a big fan of symmetrical stitches.  There are not very many overtly diagonal stitches in my day to day repertoire.  There are always exceptions.

I rediscovered this stitch as I was admiring the array of completed needlepoint just back from the finisher at my local needlepoint store the other day.  It's called Diagonal Mosaic*.

It's a great way to fill a larger space, works well in either direction (whether I like that or not), and an excellent way to add contrast with fibers, either in complementary or contrasting colors.

My favorite combo for this is Pepper Pot silk and a soft sheen metallic such as Rainbow Galleries Fyre Werks.  It's a great stitch for a roof as it lends itself to the angle of the roof (if the canvas is painted that way).  I also use it on coats (in alternating directions), bags, baskets, and trees.

This stitch diagram, along with other #whimsicalwednesday and #smallspacesunday stitch diagrams, can also be found on www.pinterest.com/whimsicalstitch/whimsicalwednesday.  

Be sure to follow whimsicalstitch.com on Facebook, Pinterest, Instagram, and Twitter.

If you like what you see on this blog, want to learn some very creative decorative stitches, and how to put them all together, whimsicalstitch.com sells stitch guides for seasonal Melissa Shirley designs.  Eight guides are currently available and more are in the pipeline.

Enjoy!

* One of the many names I found for this stitch.  As this is not unusual, you will find I describe a stitch in a widely known name (if it exists) or create my own name for it.