Santa's Landing Pad

This stitch is unique, to say the least.  And I love it.  I've used it for a blouse and a piece of fruit.  Yes, random areas but the proportions were perfect.  It also makes a perfect snow covered roof.  

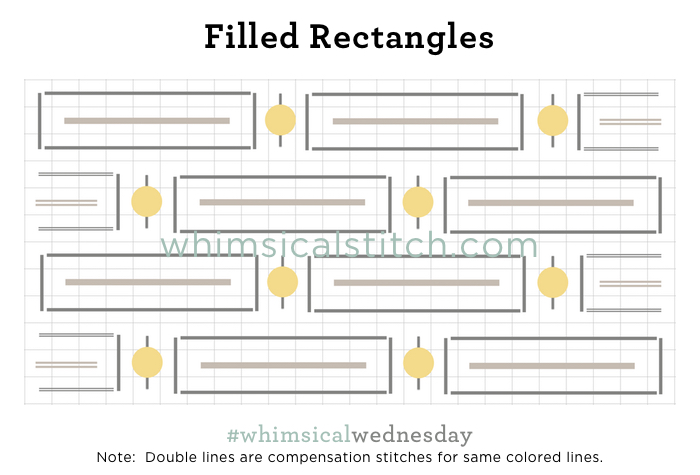
When using this stitch for a roof, I strongly recommend a well-defined thread that keeps its shape, such as a Kreinik Metallic, for the dark gray line.  If you want a little less bling on your roof, I recommend a lightweight Silk Pearl (Elegance, Grandeur, or Gloriana Princess Pearl) for the dark gray line.  For the light gray line, Flair or Crystal Braid have the perfect amount of flexibility to cover the area without overwhelming it.  The final touch is the bead between the rectangles.  A clear, white, or clear opal bead would be perfect.  Consider using light blue beading thread for the bead to add a unique smidge of color.

The two stitch samples are from the obscure objects I mentioned earlier.  The first is from a blouse on a Melissa Shirley Indian Girl. The second is from a pear on Melissa Shirley's Vintage Pears...also known as my cat's favorite napping spot.

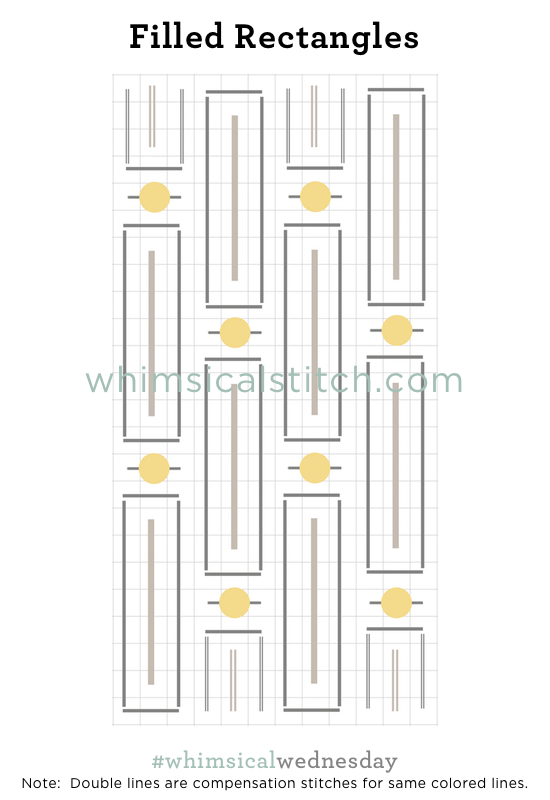
 Changing directions on this stitch is especially impactful.  This stitch on the vertical is perfect for a tall, slender area.

These stitch diagrams, along with all other #whimsicalwednesday and #smallspacesunday stitch diagrams, can also be found on a Pinterest board here.

Be sure to follow whimsicalstitch.com on FacebookPinterestInstagram, and Twitter.

If you like what you see on this blog, want to learn some very creative decorative stitches, and how to put them all together, whimsicalstitch.com sells stitch guides for seasonal Melissa Shirley designs.  27 guides are currently available and more are in the pipeline.

Enjoy!

X's and O's

I love stitching snow.  The variety of stitches we can use are virtually limitless.  I can't think of a needlepoint artist who doesn't add some sort of secondary color, whether it is gray or blue, to add depth and nuance to the snow.

And those additional colors are exactly why I favor open stitches.  The shading is so beautiful and subtle I don't want to cover it up.  Today's stitch honors that objective and is for a snowman you want to stand out.

Add the base threads (gray lines) first, and follow up with the accent threads (green and yellow lines).  

With most tramme stitches I previously shared with you on this site, I used a matte thread for the base (typically Very Velvet or a heavy Pearl Cotton).  On the stitched sample on Instagram for this stitch, I used all shiny threads.  The base thread is Petite Sparkle Rays.  The green accent thread is Crystal Braid and the yellow accent thread is Shimmer Ribbon.  

When using threads with the same finish, take a moment to make sure they are distinguishable from each other.  As an example, Neon Ray would not work with either Neon Rays + or Shimmer Ribbon as the finishes are too similar.  If you are using contrasting colors, have fun with the colors!  Finish matters less in that scenario.

This stitch diagram, along with all other #whimsicalwednesday and #smallspacesunday stitch diagrams, can also be found on a Pinterest board here.

Be sure to follow whimsicalstitch.com on FacebookPinterestInstagram, and Twitter.

If you like what you see on this blog, want to learn some very creative decorative stitches, and how to put them all together, whimsicalstitch.com sells stitch guides for Melissa Shirley and Zecca Designs.  27 guides are currently available and more are in the pipeline.

Enjoy!

Snow in September

Today's trifecta is September, snow, and small spaces.

Honestly, I'm never thrilled when new stitch months begin on a #smallspacesunday.  I get nervous that I won't have the perfect small stitch.  This month is different.  

I had to figure out what to do for small sections of snow on a tree on a Christmas stocking.  I did this technique on a whim, with translucent beads, fully expected to not like it, and worked on a backup plan while I stitched.

Turns out I loved it.  And kept it.  

Frankly, I believe what made it work was that WAS a small space.  This much beading on a large roof, or ground cover, would be overwhelming.  The stitched sample on Instagram shows a lot of the tree so you can see the context.

This stitch diagram, along with other #whimsicalwednesday and #smallspacesunday stitch diagrams, can also be found on www.pinterest.com/whimsicalstitch/whimsicalwednesday.  

Be sure to follow whimsicalstitch.com on FacebookPinterestInstagram, and Twitter.

If you like what you see on this blog, want to learn some very creative decorative stitches, and how to put them all together, whimsicalstitch.com sells stitch guides for Melissa Shirley and Zecca Designs.  27 guides are currently available and more are in the pipeline.

Enjoy!